Deploy and scale a multi-env service on Kubernetes
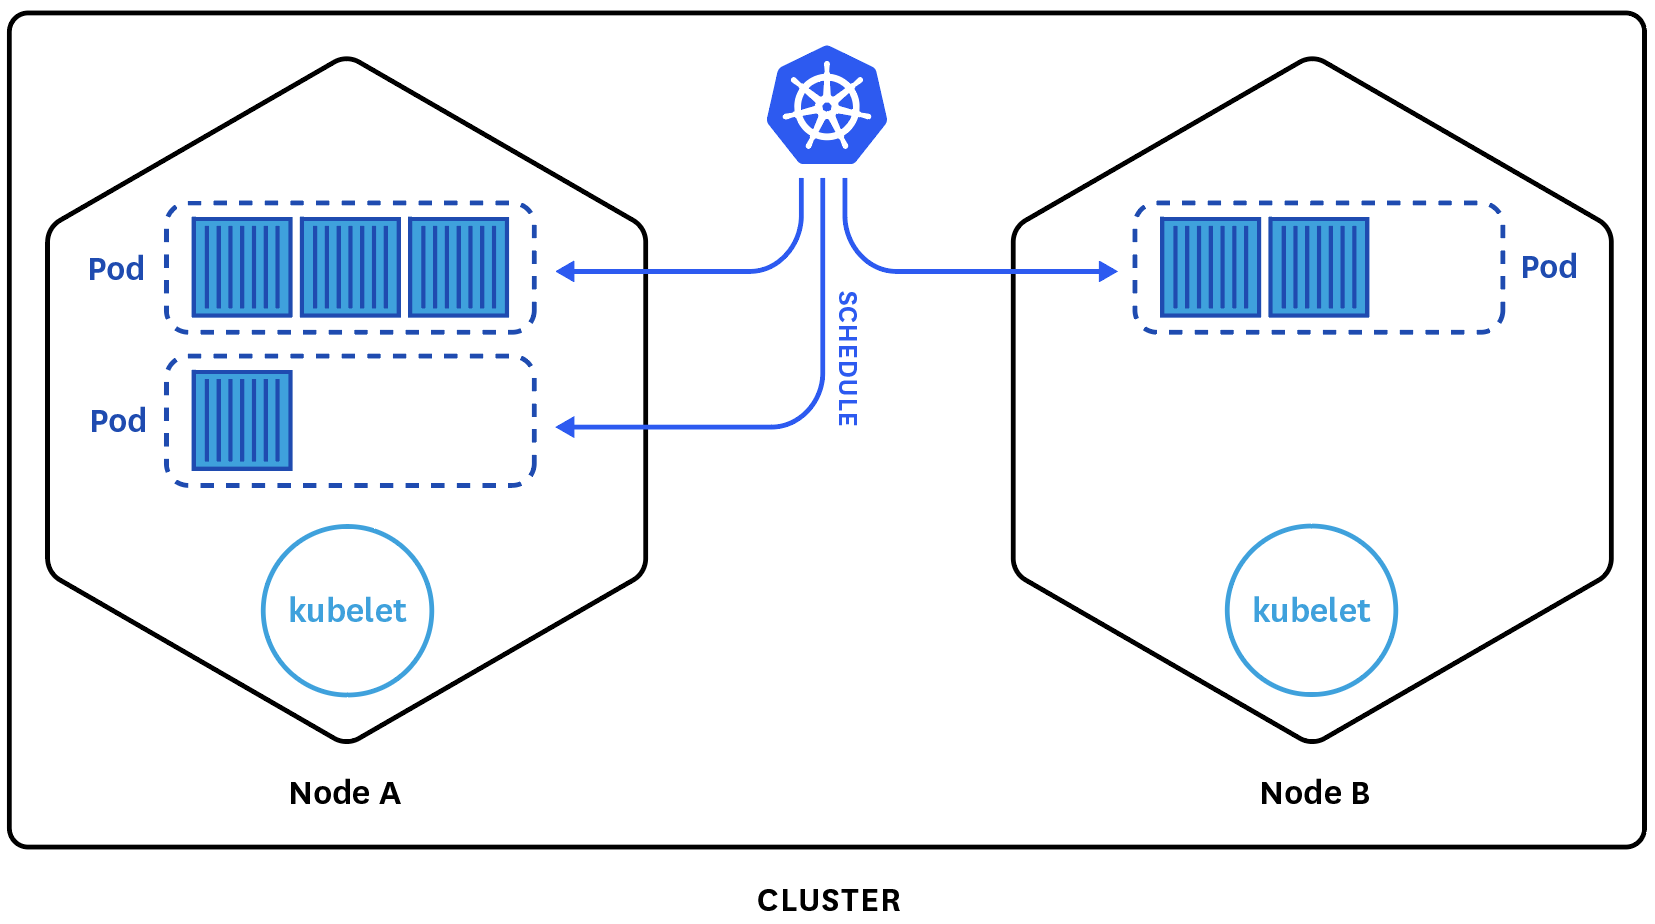
Image from datadog article.
In the previous post we created a Go microservice using the gRPC framework and packaged that into a Docker container image. Now we will try to publish our container and make it highly available somewhere publicly in the cloud. Let’s assume we plan to add a number of interconnected containerized applications in the near future and need a type of orchestration platform to easily manage them.
Kubernetes is an open-source system originally designed by Google and one of the most popular options for this purpose. Some alternative (in some ways) container orchestration engines currently available are: Apache Mesos, Docker Swarm, HashiCorp Nomad and a few others.
In this post we will be using Kubernetes - as it is my personal favorite, but in a future post we will be achieving a similar goal with Mesos - perhaps compare the two and identify their strengths.
The complete project source code can be downloaded from this GitHub repo.
Prerequisites
It is assumed that you already have some understanding of containers using Docker and the basic Kubernetes concepts as we won’t be covering them in much detail in this article.
Also, make sure you have the required set of tools installed and in your PATH:
Finally, you need to have a Kubernetes cluster setup. Based on the provider you intend to use, here are a few options on how to do that:
- For GCP, install Google Cloud SDK and follow this guide.
- For AWS, install Kops and follow this guide.
- For AKS, install Azure CLI and follow this guide
- For local, install Minikube and follow this guide.
NOTE: In order be able to simulate a large number of concurrent users, select a node configuration where the total number of cores sums up to at least 8 vCPUs. I used 2 cluster nodes with 4 vCPUs each.
Objectives
- Write essential Kubernetes manifests for deployment
- Use GoDotEnv to manage project global vars from a .env file
- Use bg-kube for multi-env deployment workflows
- Use Locust to define load tests and a grpc client
- Create a Horizontal Pod Autoscaler, launch load-tests and observe metrics
Kubernetes manifests
Now that there is a Kubernetes cluster in place, we continue with writing the first manifest.
A Deployment manifest describes the desired state for Pods and ReplicaSets. A Pod is the smallest deployable unit in Kubernetes and knows how to run containers. A ReplicaSet will ensure the specified number of Pods are running on available cluster worker nodes at any given time. So in simple terms, a deployment allows us to define the desired number of Pod replicas, each running an instance of our container.
A reason why we might want to specify multiple replicas is to achieve horizontal scaling, to better utilize the allocated nodes before resorting to additional or higher capacity VMs - a process known as vertical scaling. For more info, check out the Horizontal Pod Autoscaler (HPA) in Kubernetes which does this automatically. Some other benefits we get are load-balanced and highly available services.
A deployment manifest to support our Go service is shown below:
apiVersion: extensions/v1beta1
kind: Deployment
metadata:
  name: $DEPLOYMENT_NAME-$COLOR
  namespace: default
  labels:
    env: $ENV
    color: $COLOR
    component: $COMPONENT
    role: $ROLE
spec:
  replicas: 1
  selector:
    matchLabels:
      env: $ENV
      color: $COLOR
      component: $COMPONENT
      role: $ROLE
  template:
    metadata:
      labels:
        env: $ENV
        color: $COLOR
        component: $COMPONENT
        role: $ROLE
        tag: "$TAG"
    spec:
      containers:
      - name: $CONTAINER_NAME
        image: $IMAGE_NAME:$TAG
        env:
        - name: COLOR
          value: $COLOR
        ports:
        - containerPort: $CONTAINER_PORT
          name: transport
        readinessProbe:
          tcpSocket:
            port: transport
          initialDelaySeconds: 15
        livenessProbe:
          tcpSocket:
            port: transport
          initialDelaySeconds: 30
        resources:
          requests:
            cpu: 100m
            memory: 100Mi
          limits:
            cpu: 100m
            memory: 100Mi
A few highlights regarding the yaml config file above are:
-
We used dynamic variables i.e.
$IMAGE_NAMEto inject the actual values from a.envfile during the deployment. -
We used labels and selectors for groupings relevant to us such as to differentiate similar objects in terms of environment/role/etc.
Next, we move on to the Service manifest which describes the Kubernetes artifact that acts as load-balancer to our pods. It knows at all times how many and which Pods are running the service and forwards traffic to those only. Unlike Pods which can be terminated and replaced by new ones, a service is meant to be the reliable abstraction exposing their functionality.
An example of such a service manifest is shown below:
apiVersion: v1
kind: Service
metadata:
  labels:
    env: $ENV
    component: $COMPONENT
    role: $ROLE
  name: $SERVICE_NAME
  namespace: default
spec:
  selector:
    env: $ENV
    color: $COLOR
    component: $COMPONENT
    role: $ROLE
  ports:
  - port: $SERVICE_PORT
    targetPort: $CONTAINER_PORT
    name: http
As you may have noticed, a Service uses label selectors to determine which Pods belong to its set.
Additionally, it may expose itself with a different port than the one used by our container instances.
- Write essential Kubernetes manifests for deployment
.env file
Previously, in function getConfig in main.go, we used the configor library to load the application variables from a config.yaml file.
The library also supported overwritting their values by environment variables defined in our Config struct. Now we will set those based on the environment we intend to deploy. We will create a .env file for each environment namely .env.dev, .env.prod and even .env.staging if we wanted.
Assuming the production environment will be hosted on Google Kubernetes Engine, here’s an .env.prod file for that:
# App
SERVER_PORT=8001
DB_HOST=todo-api-mongodb.default.svc.cluster.local
DB_PORT=27017

# General
ENV=prod
COMPONENT=todo-api
ROLE=grpc-server
CLUSTER_NAME=todoapp-prod-cluster
CLUSTER_ZONE=us-central1-a

# Service
SERVICE_CONFIG=./kubernetes/service.yaml
SERVICE_NAME=todo-api
SERVICE_PORT=80

# Deployment
IMAGE_NAME=gcr.io/todoapp-123123/todo-api-go-grpc
CONTAINER_PORT=8001
CONTAINER_REGISTRY=gcr
DEPLOYMENT_CONFIG=./kubernetes/deployment.yaml
DB_MIGRATIONS_JOB_CONFIG_SEED=./kubernetes/db-seed.yaml

# Docker
DOCKER_BUILD_ARGS=PROJECT=github.com/stphivos/todo-api-go-grpc ENV=prod
DOCKER_MACHINE_NAME=default
Update CLUSTER_NAME and CLUSTER_ZONE to match your Kubernetes cluster. Also update IMAGE_NAME to reflect your Container Registry in the following form:
<hostname>/<project-id>/todo-api-go-grpc
If you use Docker Machine to run Docker on Mac or Windows, update DOCKER_MACHINE_NAME to the name of your virtual machine.
Finally, update main.go to add support for .env files using the GoDotEnv library:
1
2
3
4
5
6
7
8
9
10
11
12
13
14
15
16
17
18
19
20
21
22
23
24
import (
  // ...
  "github.com/joho/godotenv"
)

// func main ...

func getConfig() *models.Config {
    err := godotenv.Load()
    if err != nil {
        log.Fatal(err)
    }

    config := new(models.Config)
    err = configor.Load(config, "config.yml")
    if err != nil {
        log.Fatal(err)
    }

    log.Println("Configuration:", *config)
    return config
}

// func getServer ...
- Use GoDotEnv to manage project global vars from a .env file
Deployment Workflow
We will be using Helm - a package manager for Kubernetes, the first time to setup MongoDB which is used by our application. Follow the docs to get it installed on your machine.
The next step is to initialize Helm into our Kubernetes cluster by installing the Tiller. That is responsible for managing releases of charts (package installations via Helm):
helm init
We will then install mongodb chart under stable - the default Helm repository, and name the release todo-api:
helm install stable/mongodb --name todo-api
Verify the deployment Pods are ready:
$ kubectl get deployment todo-api-mongodb
NAME               DESIRED   CURRENT   UP-TO-DATE   AVAILABLE   AGE
todo-api-mongodb   1         1         1            1           1m
bg-kube is an open-source tool I wrote which simplifies multi-env blue-green deployments on Kubernetes. It can easily integrate database migrations and smoke-tests into an automated release workflow. Install using Python PIP:
pip install bg-kube
Using bg-kube, we only need to run this command from the project root directory:
bg-kube publish --env-file .env.prod
The publish command will perform the following steps:
- Build a container image using the project’s
Dockerfileand tag it with the specifiedIMAGE_NAMEvariable in the supplied.envfile. - Push the image to the specified container registry.
- Create/update a
Deploymentresource as defined indeployment.yamland label it eitherblueorgreenbased on which is the target (currently inactive) environment. - If the service is deployed for the first time, it will also create a
Jobresource as defined indb-seed.yamlthat will populate the database with seed data. - Run a provided smoke-tests command to verify the latest
Deploymentfunctions as expected. (We skipped this) - Create/update a
Serviceresource as defined inservice.yamland make that point to the latestDeployment'sPods which will handle upcoming traffic.
If you wish to proceed without installing bg-kube, you can still follow this walkthrough by using envsubst to replace the environment variables in the Kubernetes manifests and pipe that to kubectl as shown below:
# 1. Build image using Docker
docker build . -t todo-api-go-grpc --build-arg PROJECT=github.com/stphivos/todo-api-go-grpc --build-arg ENV=prod

# 2. Push image to container registry (Skip this step if using Minikube)
gcloud docker -- push todo-api-go-grpc

# 3. Set environment variables from .env file
export $(cat .env.prod | grep -v ^# | xargs)

# 4. Apply deployment.yaml
envsubst < ./kubernetes/deployment.yaml | kubectl apply -f -

# 5. Apply db-seed.yaml (Only run this once)
envsubst < ./kubernetes/db-seed.yaml | kubectl apply -f -

# 6. Apply service.yaml
envsubst < ./kubernetes/service.yaml | kubectl apply -f -
You can off course simply hardcode the values directly in the manifests, but that means you will need different copies per environment.
Verify the deployment Pods are ready:
$ kubectl get deployment todo-api-blue
NAME            DESIRED   CURRENT   UP-TO-DATE   AVAILABLE   AGE
todo-api-blue   1         1         1            1           57s
- Use bg-kube for multi-env deployment workflows
Define load tests
Locust is a load-testing library that makes it easy for us to simulate a large number of simultaneous users using Python declarative syntax.
First thing we need to do is write a locustfile to define our tests and how these access the exposed service. Since there is no built-in gRPC client, we will be writing our own but don’t worry Locust makes it easy for us.
We start by adding a common GrpcClient class that is responsible to establish a “channel” with the gRPC server and intercepts calls to the gRPC service to be able to emit Locust sucess/failure events.
Then we add another class GrpcLocust representing the swarm of locusts (the users) accessing the service and using the client from previously to invoke its methods - in our case the only RPC method defined in todos.proto is GetTodos.
import grpc
import time
import todos_pb2
import todos_pb2_grpc

from locust import Locust, TaskSet, task, events


class GrpcClient():
    def __init__(self, host):
        channel = grpc.insecure_channel(host)
        self.stub = todos_pb2_grpc.TodosStub(channel)

    def __getattr__(self, name):
        func = self.stub.__getattribute__(name)

        def wrapper(*args, **kwargs):
            start_time = time.time()
            try:
                response = func(*args, **kwargs).SerializeToString()
            except Exception as e:
                total_time = int((time.time() - start_time) * 1000)
                events.request_failure.fire(
                  request_type="grpc", name=name, response_time=total_time, exception=e)
                print e
            else:
                total_time = int((time.time() - start_time) * 1000)
                events.request_success.fire(
                  request_type="grpc", name=name, response_time=total_time, response_length=len(response))

        return wrapper


class GrpcLocust(Locust):
    min_wait = 100
    max_wait = 1000

    def __init__(self, *args, **kwargs):
        super(GrpcLocust, self).__init__(*args, **kwargs)
        self.client = GrpcClient(self.host)

    class task_set(TaskSet):
        @task()
        def get_todos(self):
            self.client.GetTodos(todos_pb2.Request(token='xyz'))
As you may have noticed, we are importing Python modules todos_pb2 and todos_pb2_grpc which were generated using the protocol buffer compiler in the gRPC Python Tools package. If you wish to regenerate the Python interface and stubs run:
# Install the grpcio-tools package
python -m pip install grpcio-tools

# Run the protobuf compiler
python -m grpc_tools.protoc \
  -I ./server/grpc \
  --python_out=./loadtest/locust-tasks \
  --grpc_python_out=./loadtest/locust-tasks \
  ./server/grpc/todos.proto
The ./loadtest directory also already contains the following files:
- deployment.yaml: Describes
locust-masterandlocust-slavesnodes. - service.yaml: Exposes the above via a LoadBalancer service.
- Dockerfile: Build a single image for both
locust-masterandlocust-slaves. - .env.dev / .env.prod:
.envfiles with variables fordevandprodenvironments. - run.sh: Shell script to run the container image on either master/slave mode.
The intention here is to run Locust distributed so we can spawn a high number of client requests. So why not rely on Kubernetes ReplicaSet resource for handling that. Using bg-kube, let’s deploy the Locust master & slaves to Kubernetes by running the same command as before but from the ./loadtest directory:
bg-kube publish --env-file .env.prod
Verify the deployment Pods are ready:
$ kubectl get deployment -l role=load-tests
NAME            DESIRED   CURRENT   UP-TO-DATE   AVAILABLE   AGE
locust-master   1         1         1            1           2m
locust-worker   14        14        14           14          2m
- Use Locust to define load tests and a grpc client
Launch load tests
First, setup a Horizontal Pod Autoscaler for the deployment:
kubectl autoscale deployment todo-api-blue --min=1 --max=10 --cpu-percent=80
Then launch Locust web interface:
open "http://`kubectl get service locust-master -o jsonpath='{$.status.loadBalancer.ingress[0].ip}'`:8089"
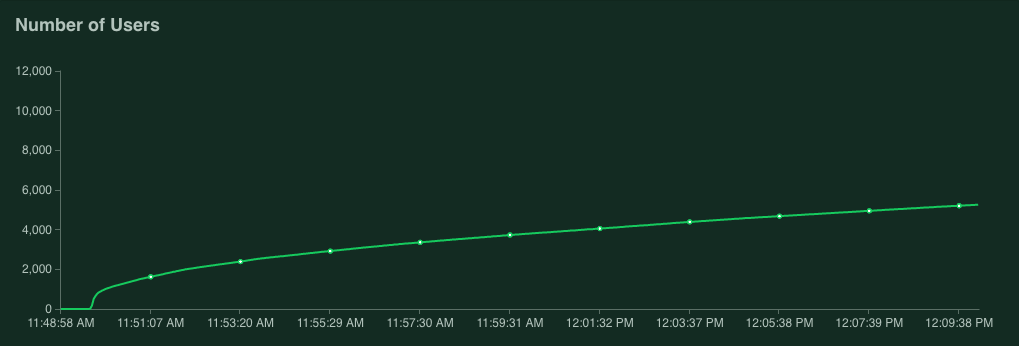
Choose to simulate 10,000 users with a spawn rate of 1000 users p/s and click Start swarming.
Now, let’s observe how the autoscaling reacts to our load-tests using the following:
watch kubectl describe hpa todo-api-blue
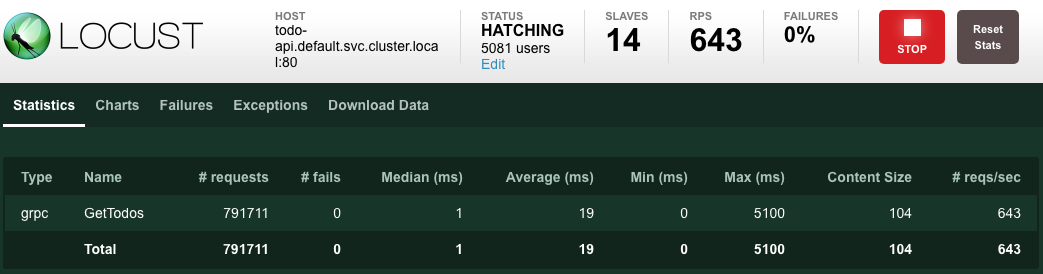
In my case I let Locust run for about 20 minutes.
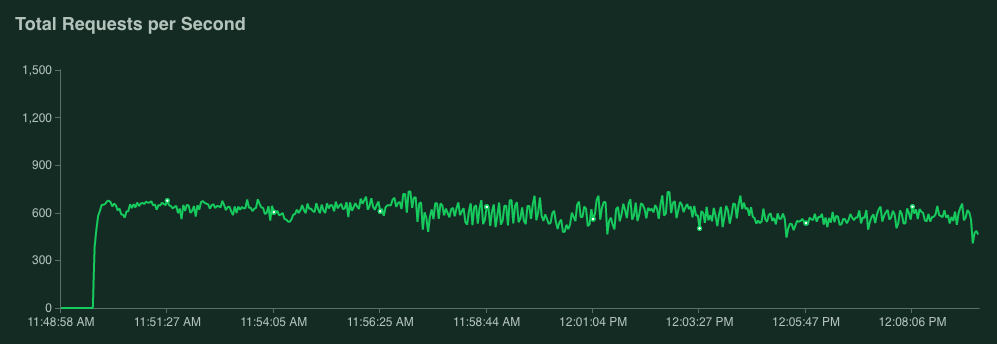

The number of replicas went steadily up from 1 to 4 and it was stabilized there since the CPU Utilization remained at around 69% while serving an approximate average of 700 requests per second.


As you can see from the aggregate stats below, in the duration of the tests we have served a total of 791,711 requests with 0 failures and an average response time of 19ms:
- Create a Horizontal Pod Autoscaler, launch load-tests and observe metrics
Wrap-up
If you had any problems following this walkthrough, please leave a comment bellow or use the Github Issue Tracker of this repo.
Thanks for reading, I hope this post has helped you in some way!
Comments